Yes, this is another blog about my love of refinishing furniture and what I have learned using designs known as “rub-on transfers”! I promise I’ll try to make it both instructional and funny…
A year ago I didn’t know a “furniture rub-on transfer” from a “train transfer ticket”. But now I am well versed (maybe) with creating art on furniture by using an assortment of furniture transfers and techniques. None of what I am about to show you is very costly or difficult. So, feel free to try it yourselves!
BLUSHING FLORAL


While I prefer to create a simple look with words and quotes interspersed among an interesting modern design, many of my “customers” like to have a virtual garden popping from their furniture. Below you will find examples of the most recent designs I have created – many by special request. Also, a few hints and links. Want a closer look? Just click on the images!
A simple 5 drawer dresser- painted blush pink with Benjamin Moore paint didn’t last long in the garage. I spotted it all tattered looking at a resell store. I knew I had to have it! The shape alone! The dresser is so unusual that I wanted to leave it without much “redo”. An uncomplicated “shabby chic” look. This piece sold to a family and was a gift for their daughter. Apparently, she likes everything “pink”.
A little deeper dive into this piece. The floral designs in the drawers and on the side were just enough to make it extra special and are becoming a “signature” of my refinished items. To create the floral design in the drawer I had to cut the flowers out from a much larger design on the transfer sheet that I purchased off Amazon – called Pressed Flowers by Thymeless Designs. Honestly, this set of transfers is one of my favorites and the ease with which they go on and stay embedded is fabulous! If we were giving scores this brand would easily be a 9 out of 10.

Under the Sea!
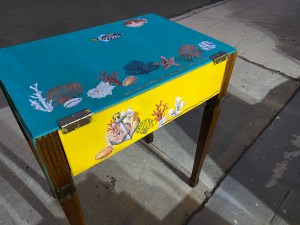


Yellow, teal, and lots of sea creatures and sea shells make this look VERY popular. I have made chairs, two small dressers, a desk using this design available from Re-Design (again) found on Amazon. My only wish was that there was less “rope” in the package and more fish of different colors. I also mixed on one of the dressers a second design by PRIMA resulted in a rather interesting look and I think it will be a winner. My score would be a 8/10 for ease of applying but a 9/10 for the final look they help to create!
Let’s hear it for the color teal!


For as long as I can remember, teal and shades of aqua have been my favorite. Perhaps it is because I am a Pisces and my birthstone is aquamarine? Regardless, I find myself dipping into various shades of these colors over and over again (pictured Tropical Teal and Hummingbird). Oh- and items made with these colors usually sell like hotcakes! They are part of their Coastal Palate (and no I am not an ambassador for them – oh how I wish!) The transfers pictured are a mixture of some of my favorites. The “Cottontail Bunnies” on the child’s chair are paired with the Polish art designs. The picture frame’s art and some of the large expansive designs on the desk came from Maika Daughters via Etsy.
The floral transfers can be tricky to apply if not careful and the words also are a challenge from time to time. So, I give these transfers a 7.5/10 for ease but a 9/10 for the look and response from others!
Helpful Hints!


When using furniture transfers you need to be CAREFUL. I have yet to meet a design that doesn’t rip if not given lots of TLC during the transfer. Be sure that your surface is clean and dry. Do not transfer onto surfaces with gloss or semigloss unless the transfer is made for those finishes. Some are. Some are not.
Transfer with the support of a flat surface – so use a strong table or workshop bench when transferring to smaller objects (like boxes) or dresser drawers. If transferring directly to a piece of furniture make sure it is secure and kept steady.
Practice on something you don’t care about first so you can get used to how much pressure is needed and the type of instrument to use. The “sticks” they often send in the kit are in my humble opinion not very helpful with larger designs. I tend to improvise with other objects such as paint stirrers.
When I am working on a very large design I cut it into pieces. This helps to keep it manageable and also to create some interesting designs. You can overlap by completing one portion of the design and then cutting and laying on top of another portion. Be sure to complete the transfer of the first part before starting the second.
The hardest of all transfers for me to apply involves quotes or letters. These tend to be very delicate and need much patience. I tend not to have a lot of that – so I often goof. I have learned to be better – but again – patience, patience, patience!
If you goof, try adding a “surprise” element. It is amazing how handy a butterfly transfer can be when you goof! Or a fun flower! I buy packets of butterflies just for this reason!
Oh and buy a big container of baby wipes to get the “oops” of designs off your fingers. You will thank me later.
Keep unused portions clean and tucked away for another day! And lastly…just have fun and let your creativity flow!
Thanks for reading!
~Louise
p.s. Feel free to pop a link to your furniture refinishing projects in the comments!


